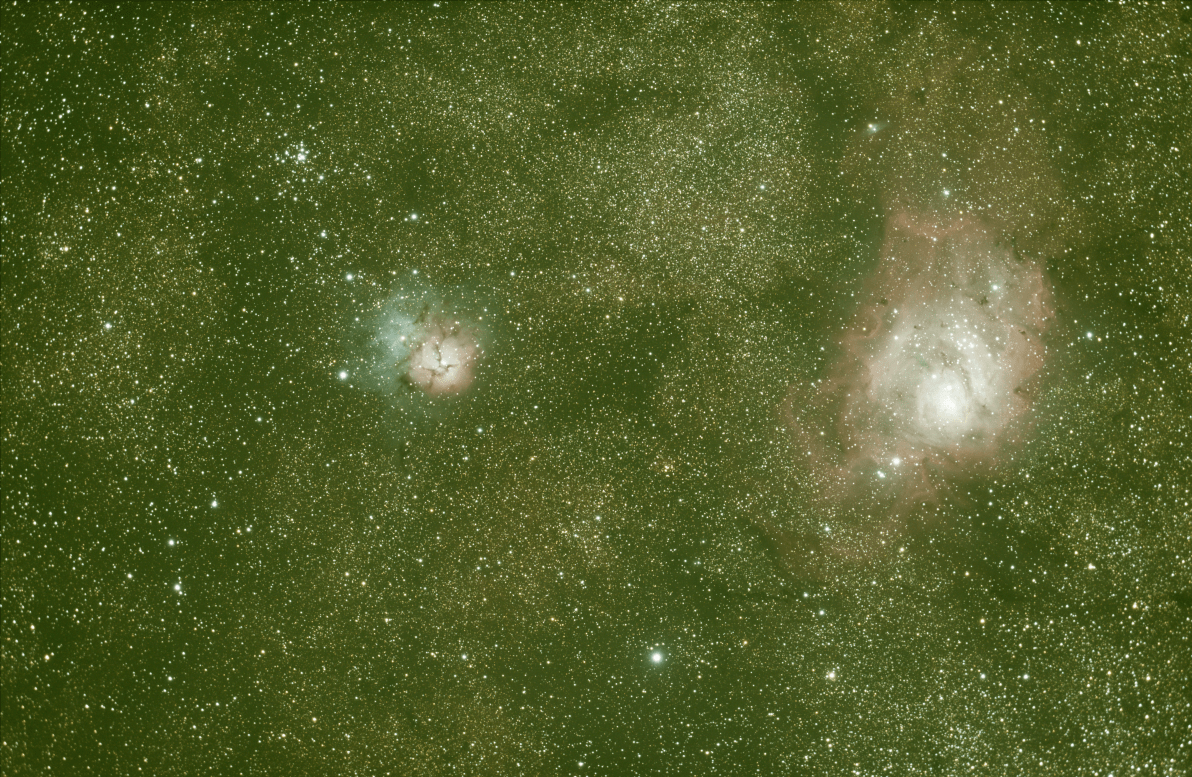
Trifid and Lagoon Nebula astrophoto + workflow and review
For full resolution & technical specs see the astrobin page here.
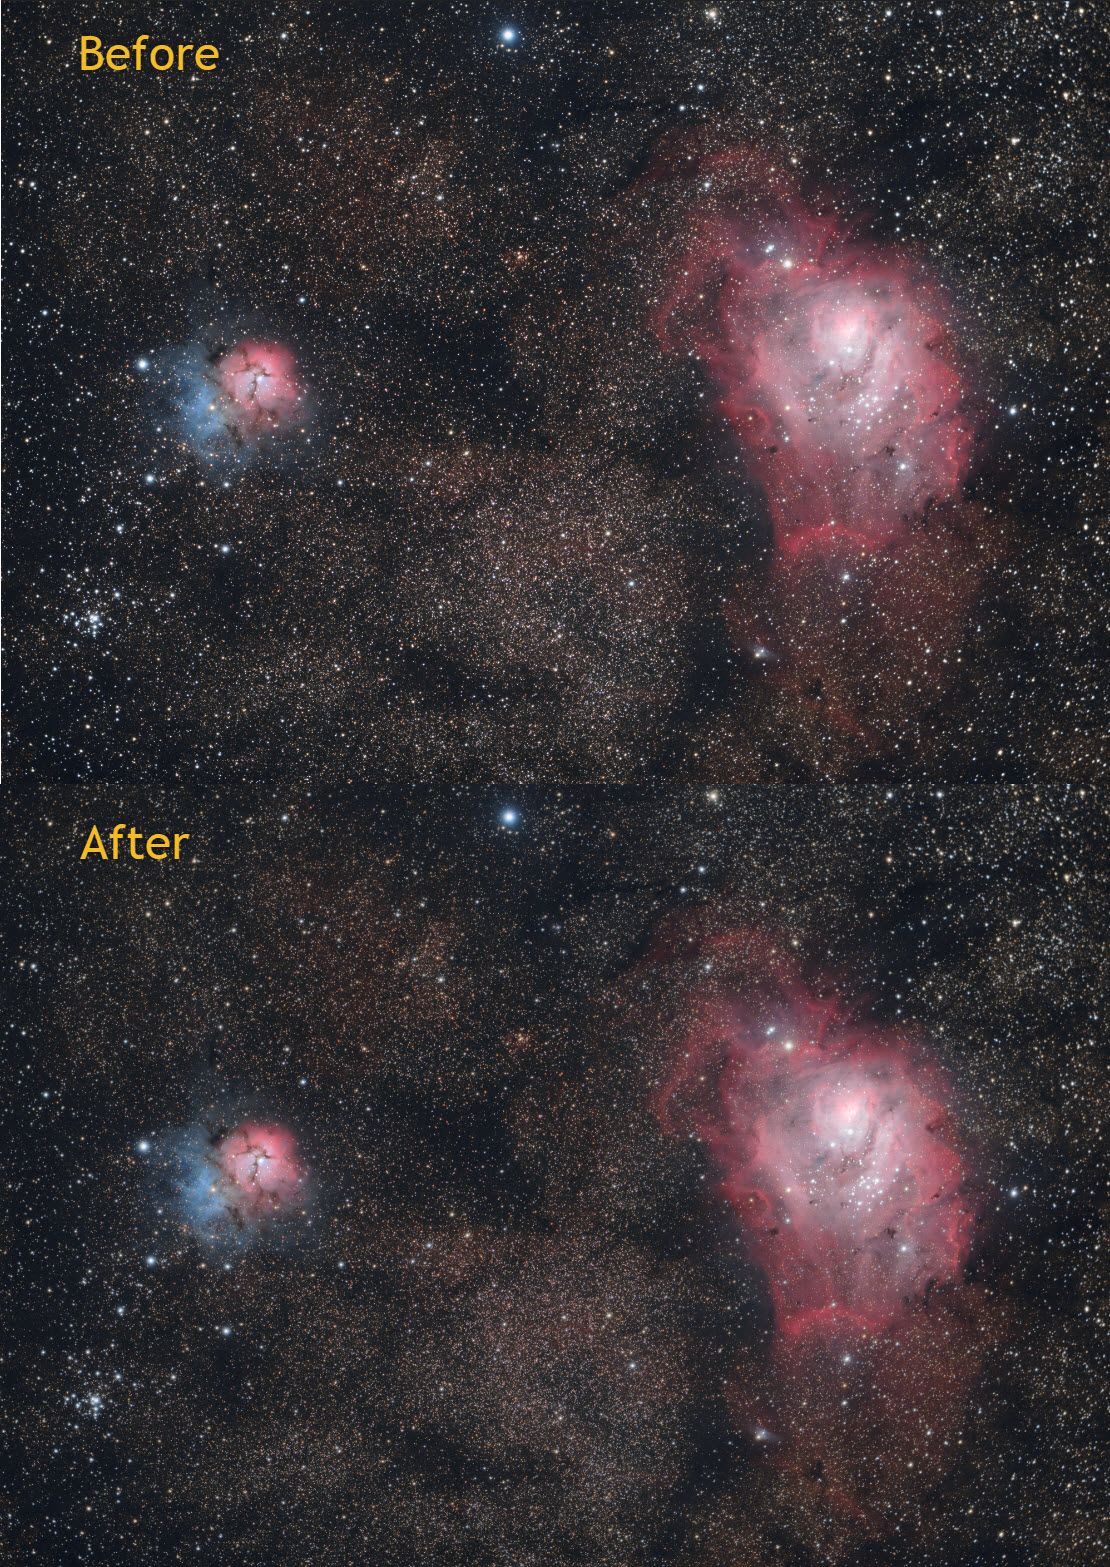
Clear nights have been pretty sparse this winter but the start of the month offered one sandwiched between days of cloud and howling winds. Much of the opportunity was squandered as I burned a couple hours fretting over my camera which refused to fire its shutter consistently. Of course, when I was about to chalk it up as broken and head inside, I realised I hadn't plugged my usb hub into the mains! My camera's powered via the hub but it still sorta half works when the hub is only powered by it's usb connection to my laptop. I probably would've caught on sooner if the bloody thing just didn't work at all but it seems the minor details of the setup ritual can slip after being away from observatory for a while! All said and done I ended up capturing 1hr of exposures under clear, moonless skies and it was definitely worth it! I'm happy with the final image but I learned so much while processing. Read on to learn more about the objects and the processing applied to get the result.
About the objects
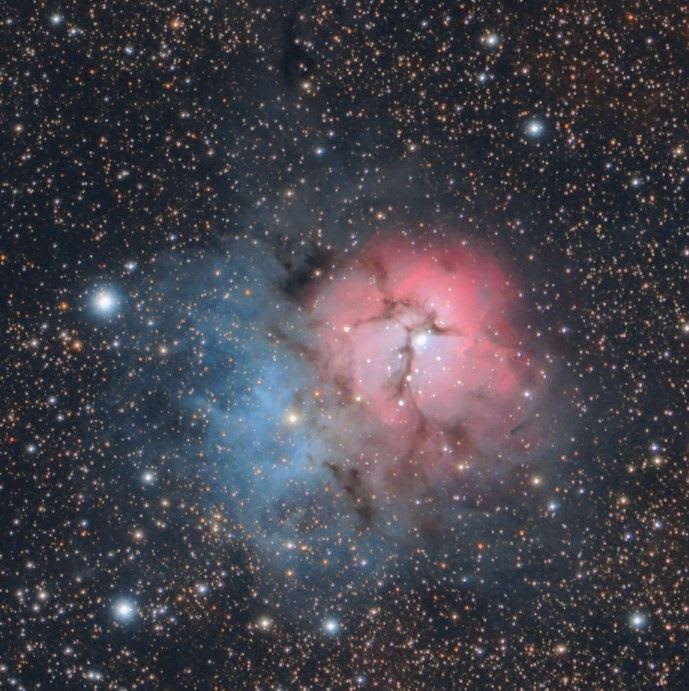
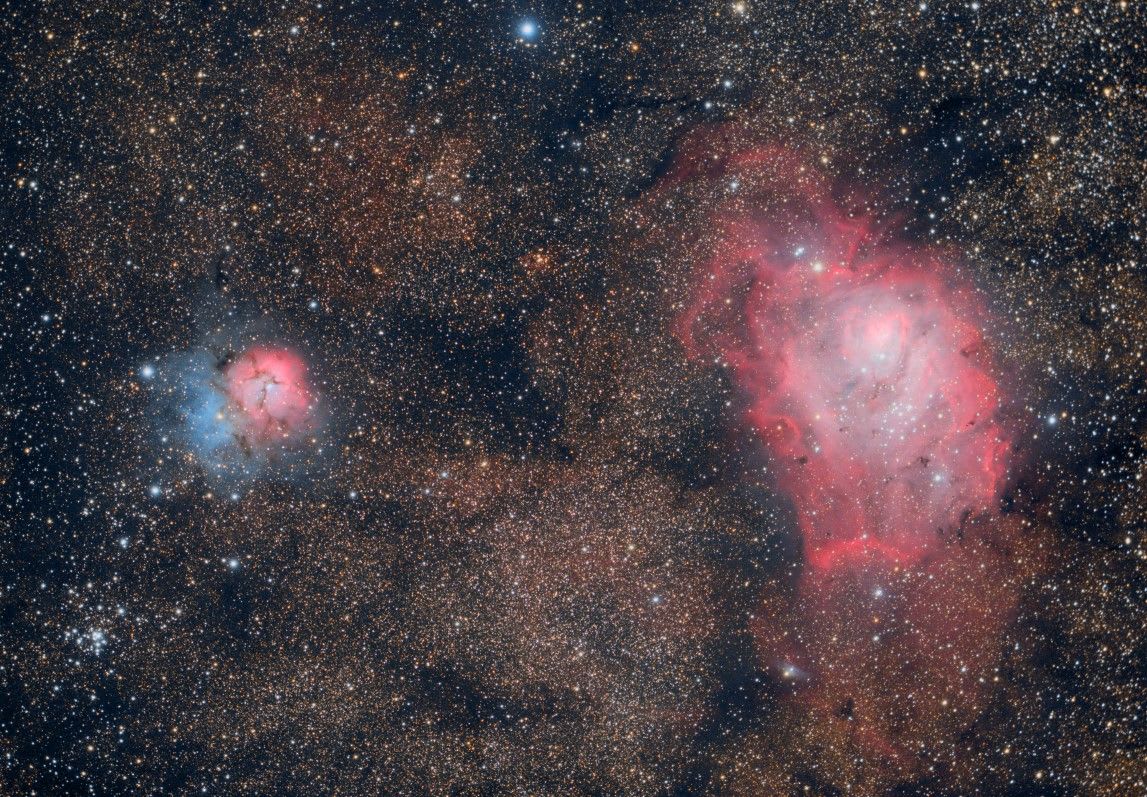
The Trifid Nebula is known for being a great illustration of the 3 types of nebulae. The blue area is 'reflection nebula' where it's light comes from dust that is illuminated by the stars around it. The red area is 'emission nebula' and its light is emitted by hydrogen gas rather than reflected. The dark vein-like filaments are 'dark nebula' which are simply the silhouettes of clouds of dust.
The Trifid is neither the largest or brightest nebula in the sky but I think it's contrasting features give it a unique visual appeal. Not just with regard to colour, where the red and blue collide pleasantly, but also in a luminous sense where the filaments of dark nebulosity crack the brightest part of the object like a lightning strike. It adds some drama to an object otherwise all too symmetrical and grants it its namesake: 'Trifid', derived from latin 'Trifidus' meaning 'divide into three'.
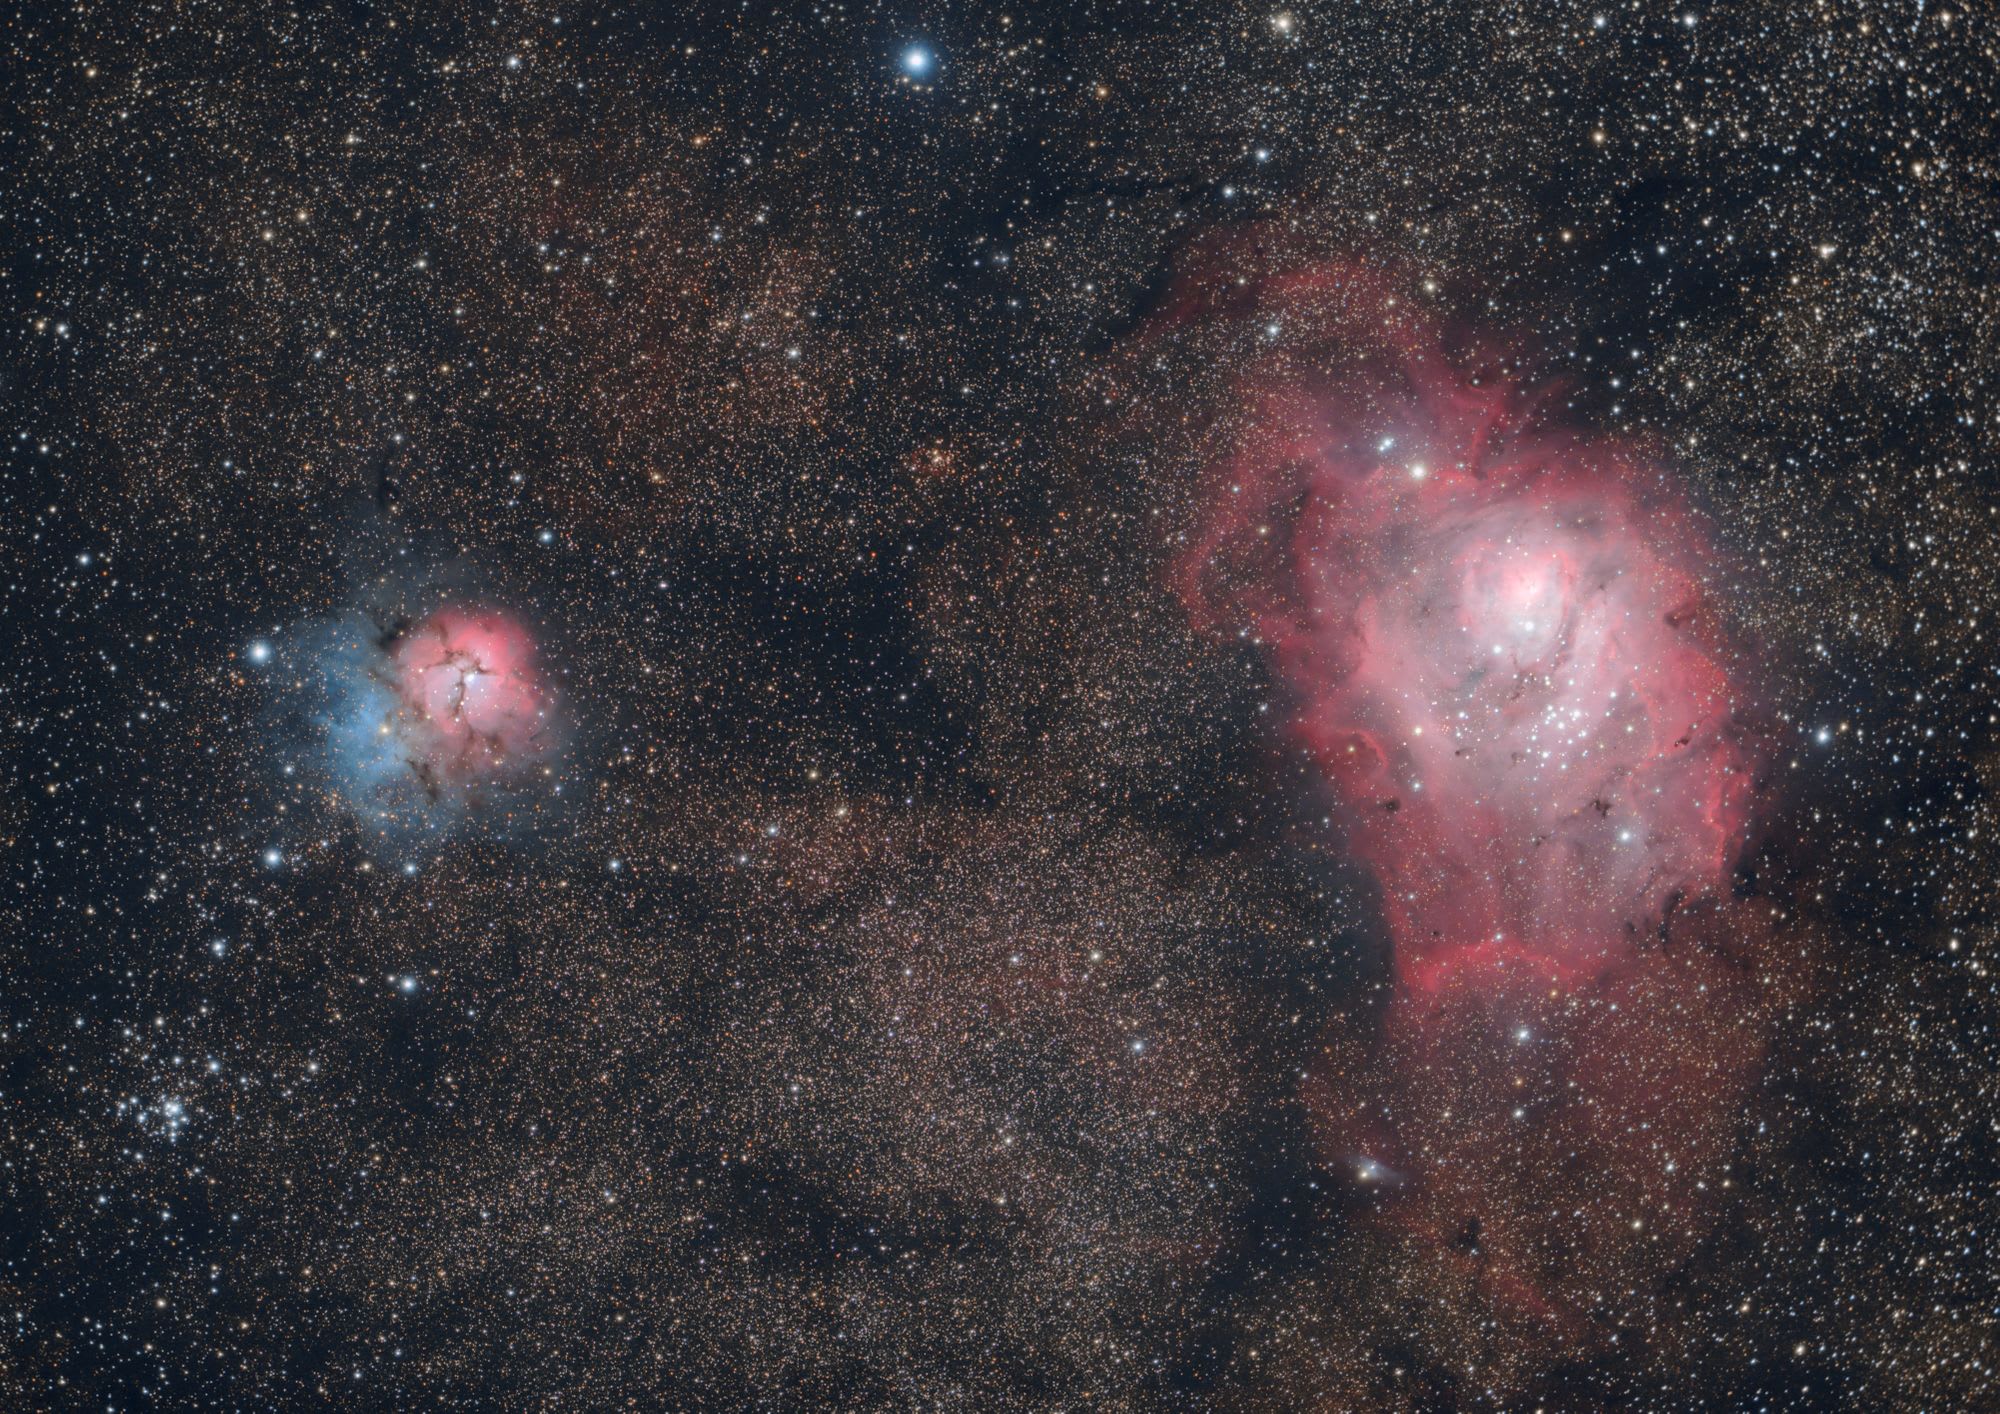
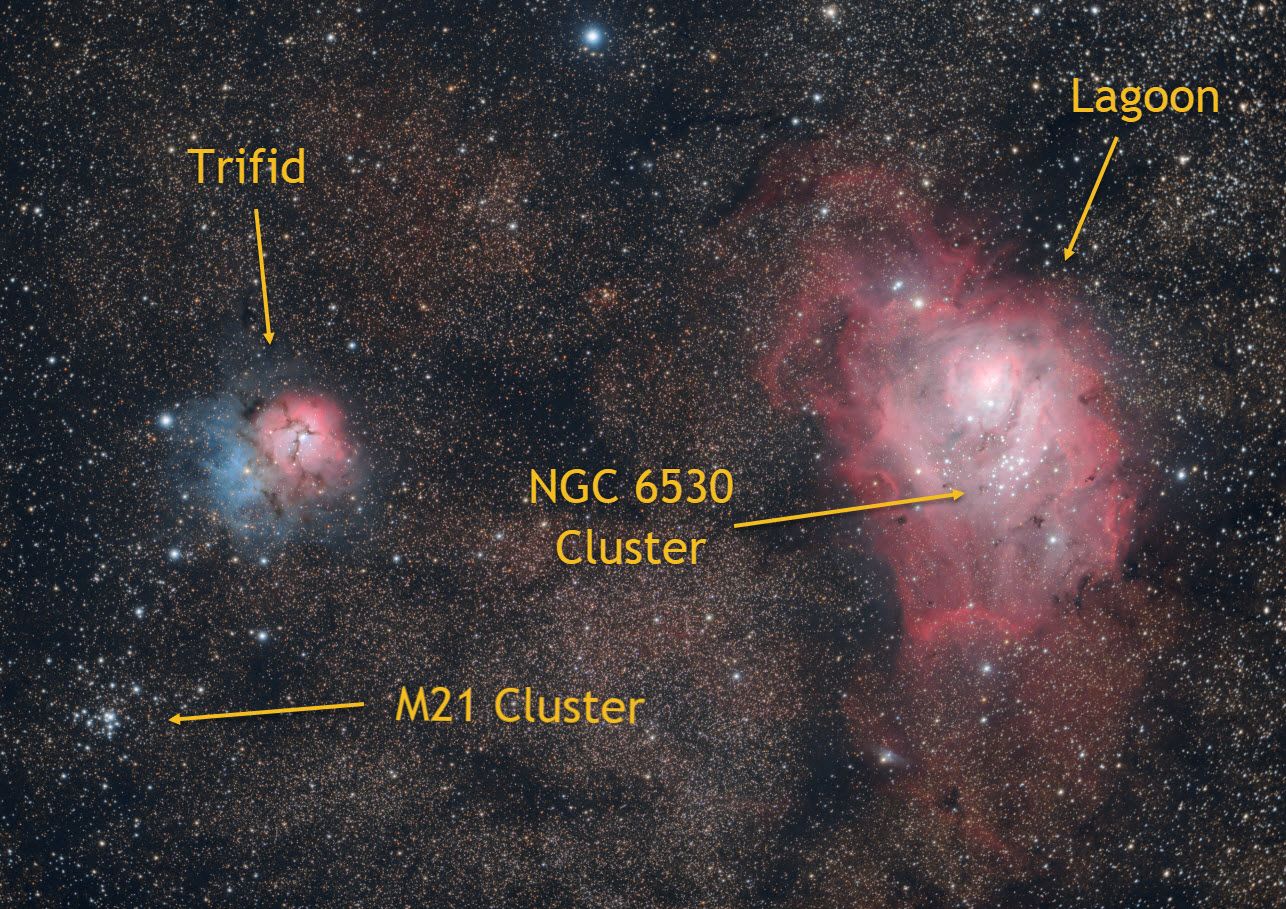
The Lagoon nebula, on the other hand, is a true superstar of the night sky. It's large, bright and has it's own open star cluster nestled in the heart of it. The thick walls and ridges of colourful cloud that carve out its border envelop an interior of smooth, gently curving sheets of bright nebulosity. Small pillars and strings of dark nebula serve only to accent its features rather than distract or conceal. Closer examinations progressively pull you further and further in as new details emerge just as appealing as the last. All in all, its any easy object for anyone to appreciate its beauty.
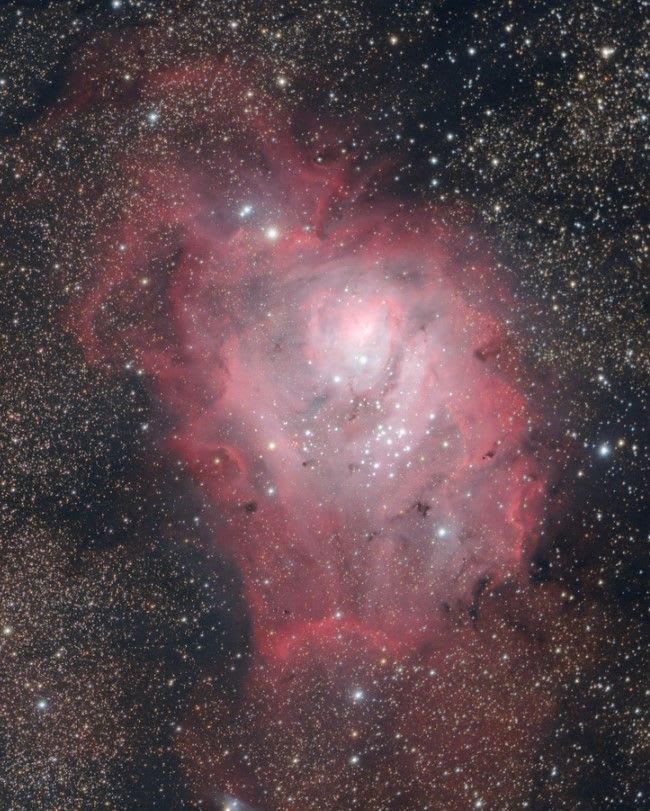
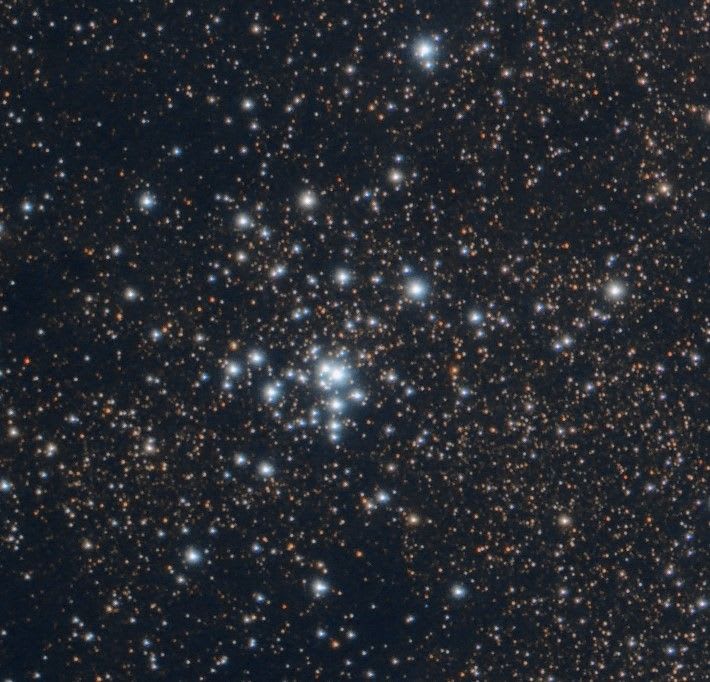
An honorable mention should go to the open star cluster M21 which is visible in the bottom left of the image. It has no relation to the other objects in the image, apart from its relative proximity to them from our perspective, and it's stars are much older than the Trifid nebula itself.
While it may seem something of a feat to have 3 messier objects in one image, we are, in fact, in a very busy part of the night sky. These objects are located in Sagittarius and near the core of the Milky Way, hence why there are so many stars in the image that seem to cohere into dusty orange objects of their own.
Stacking and linear processing
I was able to get through a much more thorough processing workflow for this image, at least compared to what I've done in the past.
Stacking was done in DSS with my usual process: Lights with kappa-sigma clipping + flats + bias. No darks this time as I'm not too sure about how consistent the temperature of my sensor is despite it's cooling apparatus. I intend to investigate more thoroughly in future but it's a tricky issue to tackle so I'm content to just dither in the meantime.
I also intend to test other stacking applications in the very near future as I'm aware DSS is getting on and doesn't deliver the best results anymore. I'm hoping to get Siril's stacking to function smoothly for me as I know it can deliver results on par with the big boys but it's also free and I already use it for the post stacking phase of my workflow anyway. I'll probably do a very unscientific comparison of stackers and publish it to this blog so keep an eye out for that.
Linear processing of the stacked image was done with Siril. The order of processes follows in order: Crop, Photometric colour calibration, Green noise removal, Deconvolution, asinh transform, Histogram transform, Colour saturation.
In future I'd probably skip the deconvolution step as I struggle to find any settings that don't introduce ringing artifacts in the stars. In this image I went with very mild settings where the ringing was barely noticeable but I'm pretty sure the mild effect was just exacerbated by other processes further along in the workflow. I could just be using it wrong but the tool only gives a few knobs to twiddle so the implementation might not be good. I think the problem sits squarely with it's ability to mask the stars but it doesn't give you much feedback on what it's doing on that front. Either way it did not produce any desirable effect for me even after letting the stars ring out so I'm inclined to skip on committing any degree of adjustment from it in future.
Another process I don't like in Siril and one I actually did skip was Background extraction. The tool seems simple enough to use but for whatever reason I can't get good results with it. Maybe it's an issue with my flats or something but it always seems to shift the background glow to different parts of the image rather than extracting it. Fortunately my skies are dark anyway and I don't have to contend with any strong gradients from street lights or anything like that. Ultimately I prefer to skip this step as I feel my backgrounds are more balanced without the process.
Also note that while the background in my image is relatively bright, that's mainly by choice. There is a lot of faint dust floating around in this patch of the sky and I didn't want to darken the background as much as I normally would at the risk of crushing those details.
One last thing worth mentioning is that SiriL does have a feature that can extract the background from every individual sub during the stacking process. Conceptually this could be something very powerful as most gradient sources tend to move relative to the camera perspective over an imaging session (think of how the angle of light from a street lamp will change as your telescope tracks across the sky through the evening). Again, that doesn't apply to me so much but it may end up producing better results than the regular tool does, just for extracting regular sky glow.

One SiriL process that I do love though and will never skip is 'Photometric Colour Calibration'. It plate solves your image and applies colour information according to its location in the sky. When it works, it consistently delivers a result I'm always pleased with, and I say 'when it works' because sometimes, maybe say 20% of the time in my experience, the plate solve will fail for no apparent reason. Fortunately it also provides a pretty good tool for more traditional calibration although sometimes it feels like I can only ever get the balance 98% right and that last mile is always out of reach. This is an issue I have with regular calibration in general though, not just with SiriL. That's the main reason I love the Photometric option so much - it just always feels spot on.
Another SiriL process that I love is the 'asinh transformation'. This performs the same function as a histogram stretch but it respects the original RGB ratios of your pixels. More plainly it will preserve colour as you stretch the histogram and avoid washing out the highlights like it would with the regular histogram transform tool - all without touching saturation. One practical effect of this that I really appreciate is that it really maintains the colour of your stars which can add another dimension to images. It is easy to go overboard however. In this image the starfield is so dense that it produced thick clumps of brown and orange that looked like dust and dirt scattered over it. I tried to mitigate this by doing some of the stretch with the regular histogram transform tool but I also had to dip into the Saturation tool and desaturate Orange-Brown/Yellow to really get it under control.
Non-linear processing
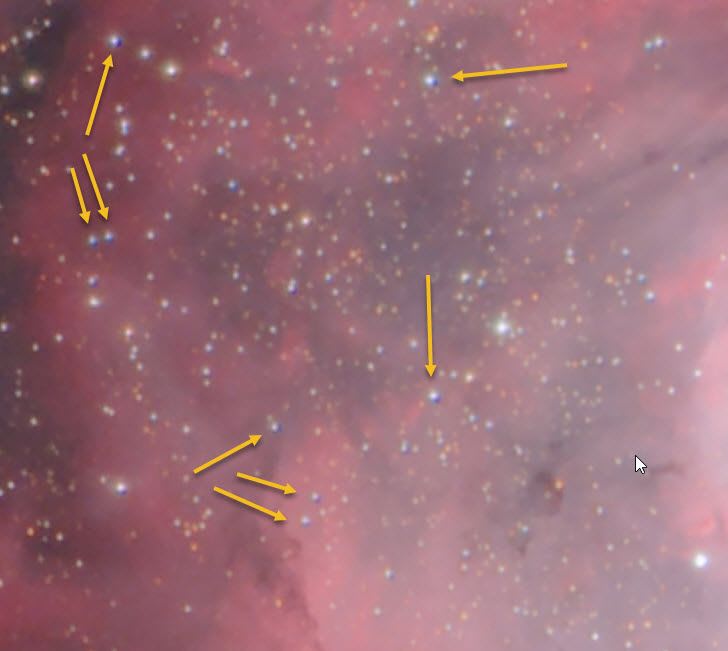
The post linear editing phase has been a weakness of mine as it's been a slog to try out the various applications available, let alone settle on one. There's a lot of initial learning you need to do up front just to get a proper impression. As a result I've been doing as much non-linear stuff as I can in SiriL, then just doing minor touch ups in Affinity Photo, which has emerged as my preferred option from the Photoshop/GIMP/Affinity trinity (I'll write more on why in another post). For this image, the adjustments in Affinity we're mostly just limited to further tweaking of curves and levels for a bit more contrast and vibrancy. There real star of the show though, has been my first attempt at a proper star reduction.
One issue I always struggle with is stars dominating the image and distracting from deep sky subjects. It's a common occurrence in busy parts of the sky but it also tends to get exacerbated by further processing like when stretching the histogram and adjusting curves. Editing suites like Affinity really come to the rescue here as you can use their advanced selection tools (the absence of which really hampers SiriL as a complete astro processor imo) to isolate different parts of the image and, in this case, effectively generate a star mask. Affinity in particular is very easy to use for this as it allows you to select the highlights and grow/feather very responsively to get the selection smooth and accurate.
The actual weapon of choice for the reduction is the 'Minimum blur' filter. It's easy enough to shift it up and down and observe the results in real time which is much more pleasant than using Photoshops preview. I do get some issues making subpixel size adjustments as sometimes it appears to do nothing, then the same size adjustment at a different level will appear to do a lot. It's still granular enough that you will find the level you're looking for though.
The results aren't perfect - up close scrutiny will reveal smudginess around stars - but it certainly achieves the desired effect at the macro scale. At some point I'll start looking at Starnet as I expect it'll deliver cleaner results but for now I'm very happy to have added a technique to the arsenal that I consider fairly necessary for most DSO's if they're in an even remotely busy part of the sky.